
11 Tips to Give a Professional Look to Your Scores in Guitar Pro

Guitar Pro is one of the most popular tools for creating, editing, and sharing guitar tablatures and sheet music. But even the most accurate transcription can look messy if not properly formatted.
In this article, you’ll learn 11 easy tips to give your Guitar Pro sheet music and guitar tab a professional and polished look, the kind that’s ready to print, publish, or sell online.
Step 1: Sync Your Score with Audio using Guitar Pro v8
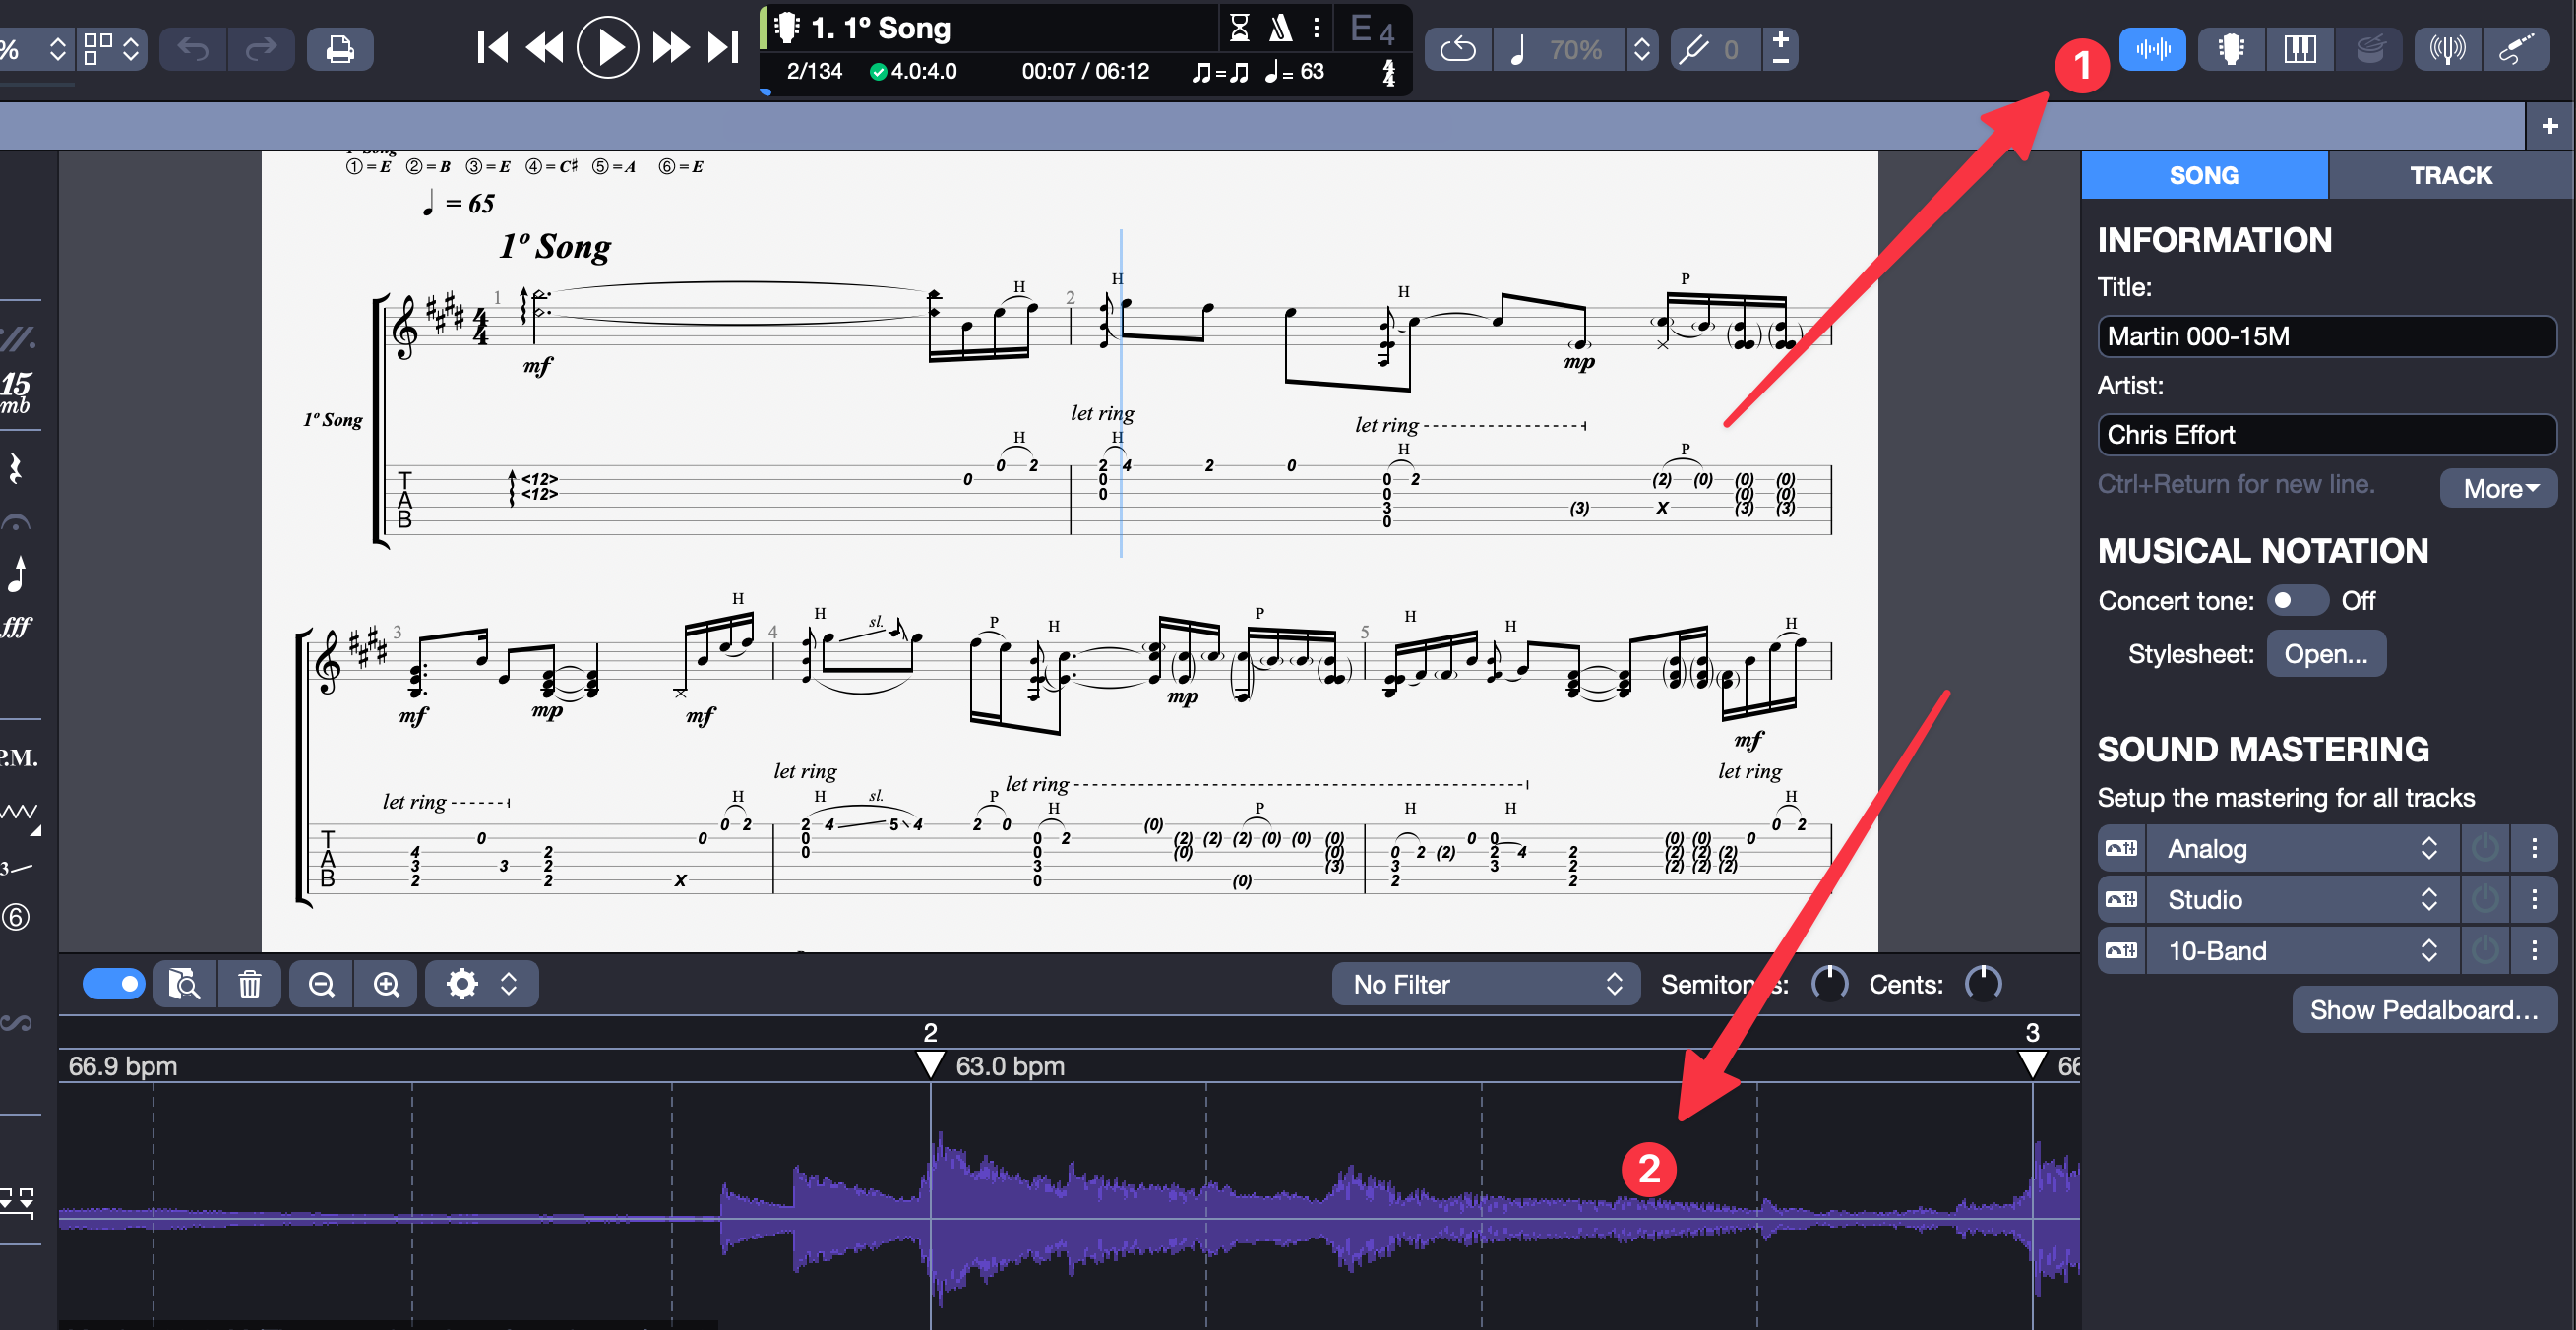
Adding synchronized audio playback makes your score come alive. Whether you’re aligning your tablature with a studio recording or a personal guitar track, syncing helps others see and hear your work perfectly in time.
To sync your score with audio in Guitar Pro v8:
- Import your audio file
Click the Audio icon
Then, choose Add Audio File and select your.mp3,.wav, or any supported file that matches your song. - Align the audio with your score
After importing, your waveform will appear under the notation area.
Drag the audio start marker so the waveform lines up with the first note or bar of your score.
Use the playback controls to check synchronization, adjust slightly if necessary until the score and audio play in perfect rhythm. - Fine-tune tempo and alignment
If your recording tempo varies slightly, add tempo markers in the timeline (click under the waveform) to match your performance’s timing precisely. - Save and test playback
Once synced, play your score. You’ll hear the original audio and see your notation scroll in time, ideal for students, performers, and PaidTabs buyers who want to play along.
Step 2: Add Your Personal Touch
Guitar Pro offers three default styles Rock, Classic, and Jazz, accessible from
File > Stylesheet > Options > Apply Style.
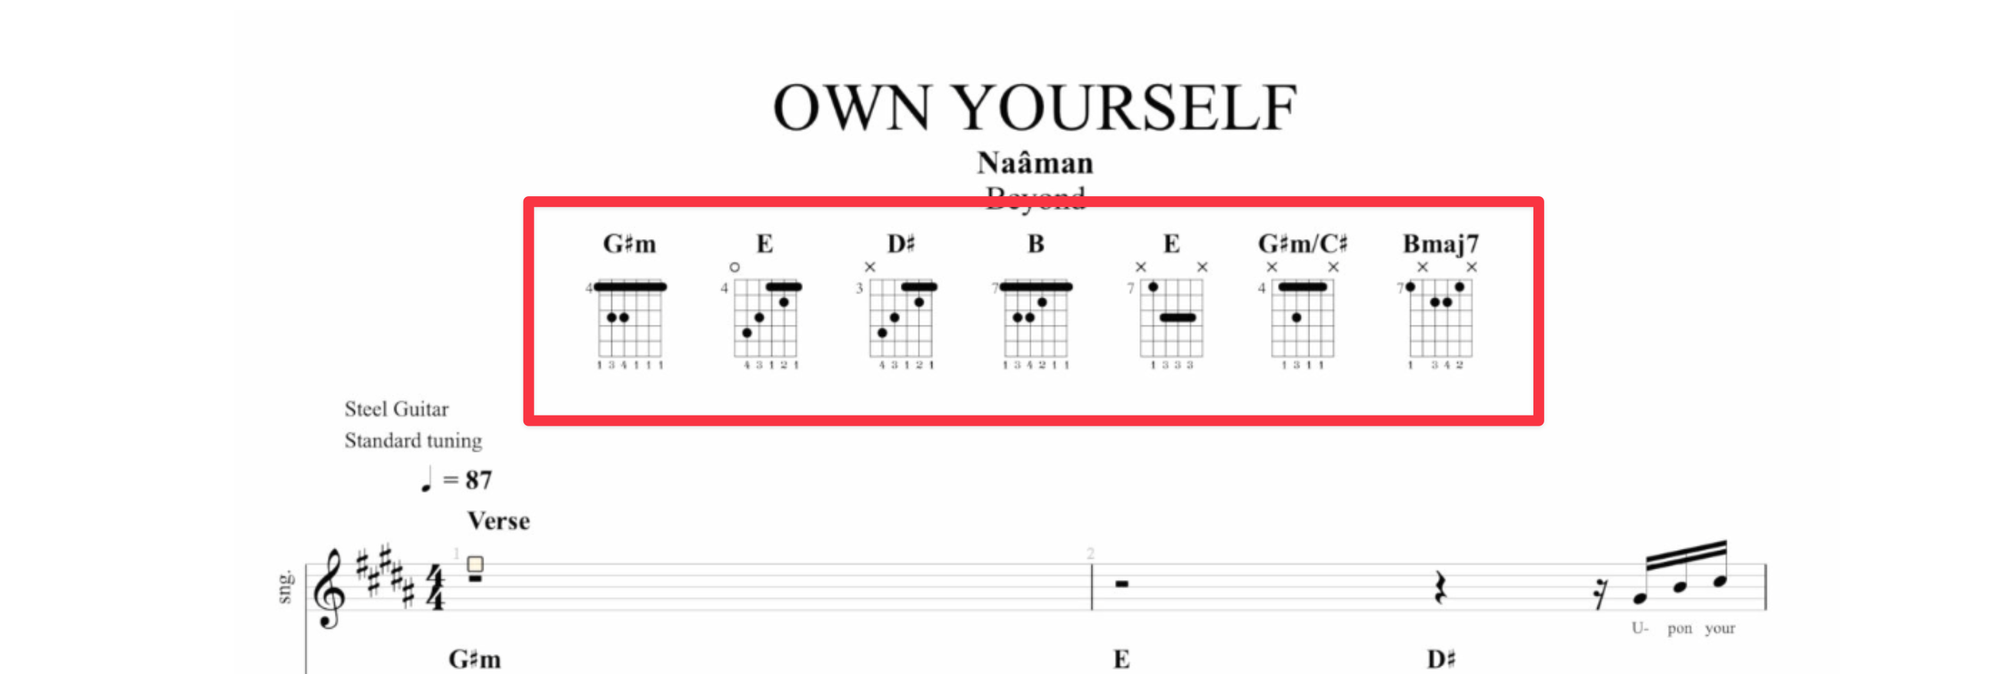
But if you want your scores to look truly professional, you can go a step further by using the same layout used by top transcribers on PaidTabs like Kfir Ochaion.
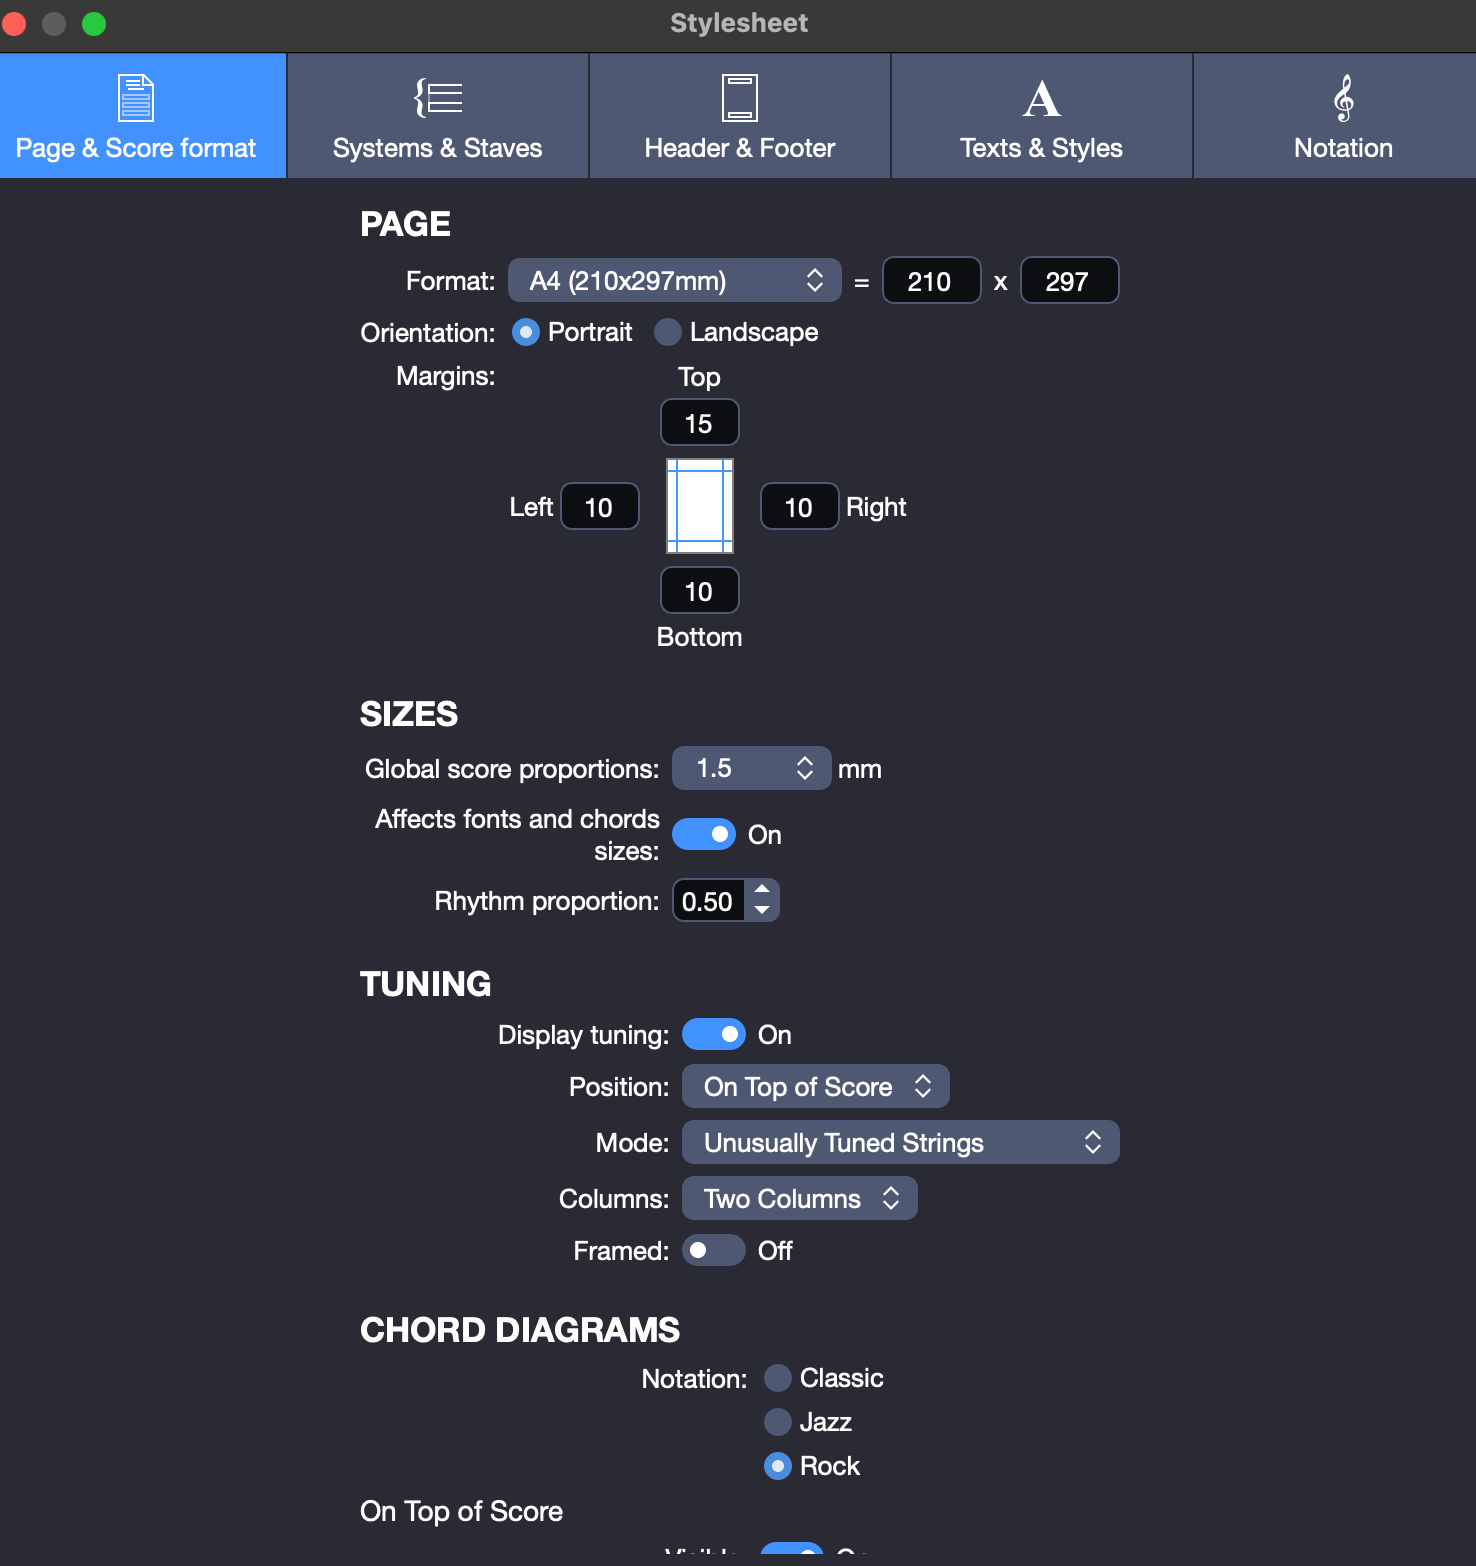
Kfir Ochaion Style Settings:
| Category | Setting | Value / Description |
|---|---|---|
| Page & Format | Format | A4 (210 × 297 mm) |
| Orientation | Portrait | |
| Margins | Top 15 mm, Left 10 mm, Right 10 mm, Bottom 10 mm | |
| Global Score Proportion | 1.5 mm | |
| Rhythm Proportion | 0.50 | |
| Affects Fonts and Chords Sizes | On | |
| Tuning Display | Display Tuning | On |
| Position | On Top of Score | |
| Mode | Unusually Tuned Strings | |
| Columns | Two Columns | |
| Framed | Off | |
| Chord Diagrams | Notation Style | Rock |
| Position | On Top of Score | |
| Visibility | On |
This setup ensures optimal readability, balanced spacing, and a modern visual tone, perfect for electric or pop-rock arrangements.
Step 3: Complete Song Information
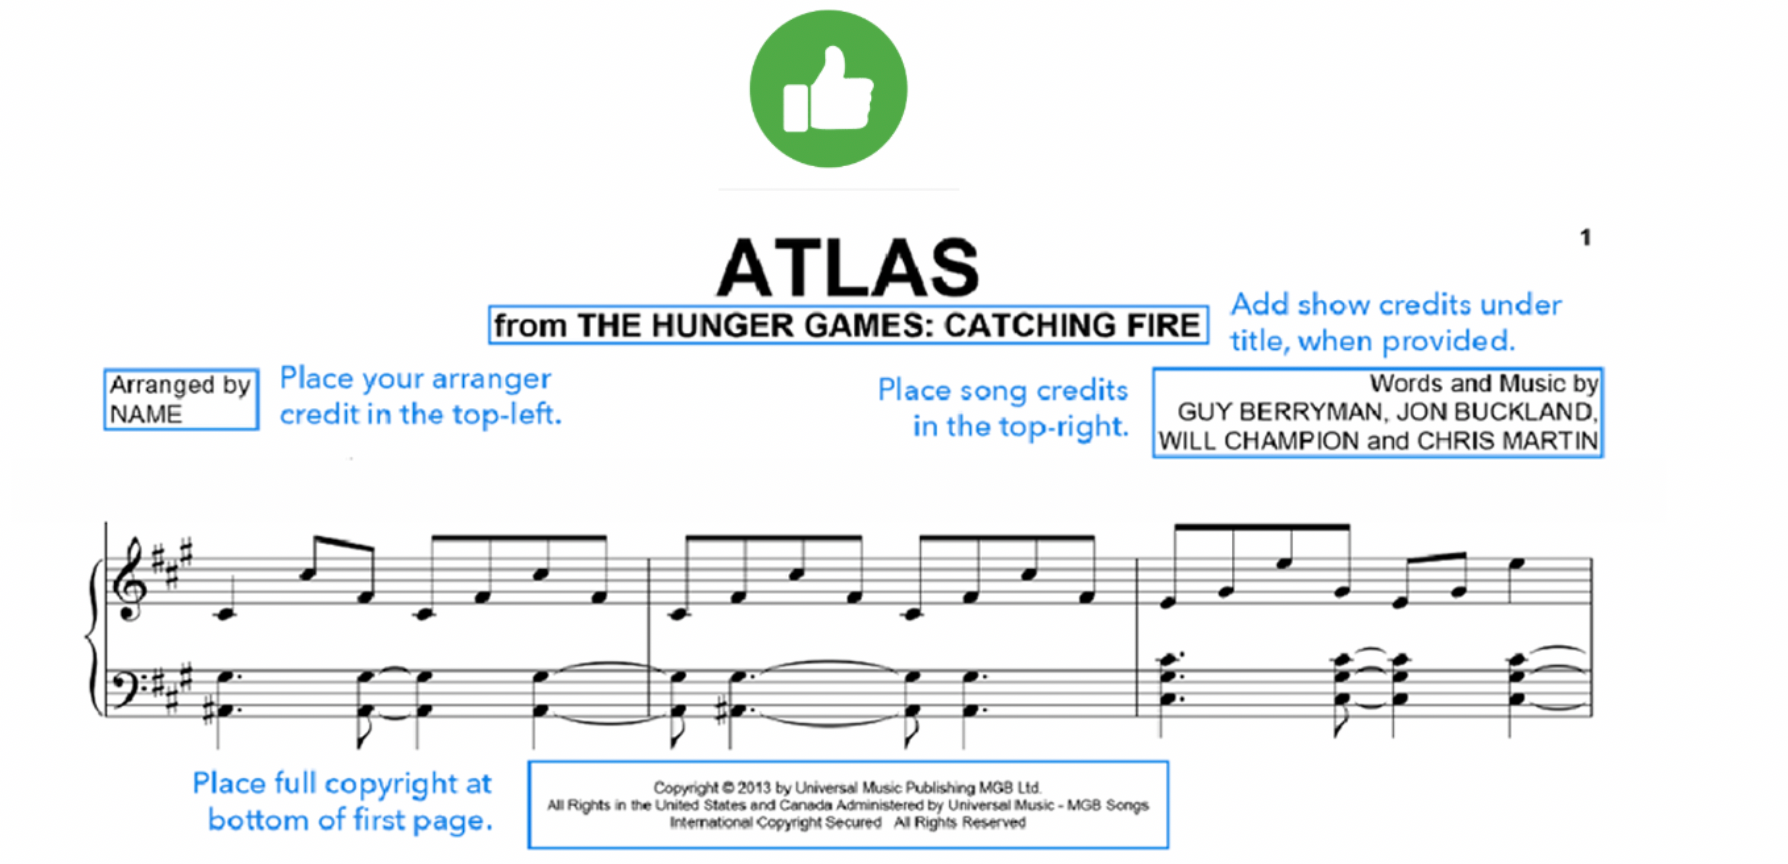
A professional score always includes detailed song info.
In the Inspector > Information section, click More to access fields for:
You can also set your personal details as defaults in Preferences > My Information, so they’re automatically included whenever you create a new file.
Pro tip: Including your PaidTabs profile link in every score gives your work a consistent professional signature, and helps listeners or students find and support your music directly on your profile.
Step 4: Fix the Bar Count per System
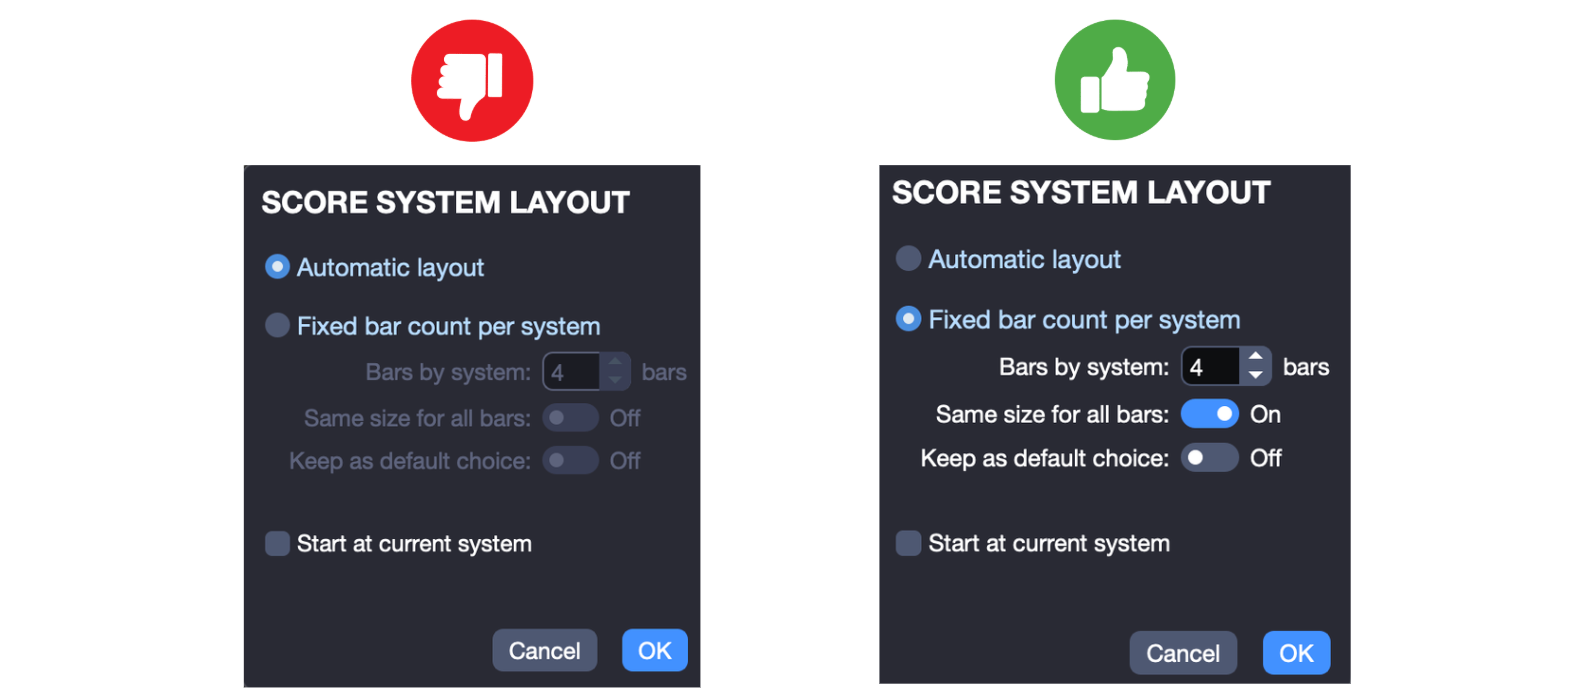
Uniform spacing makes your score easy to read.
Right-click on your score and go to Bar > System Layout > Score System Layout to set a fixed number of bars per line. This keeps your pages balanced and consistent, especially useful for educational materials or published arrangements.
Step 5: Use Brackets to Group Instruments
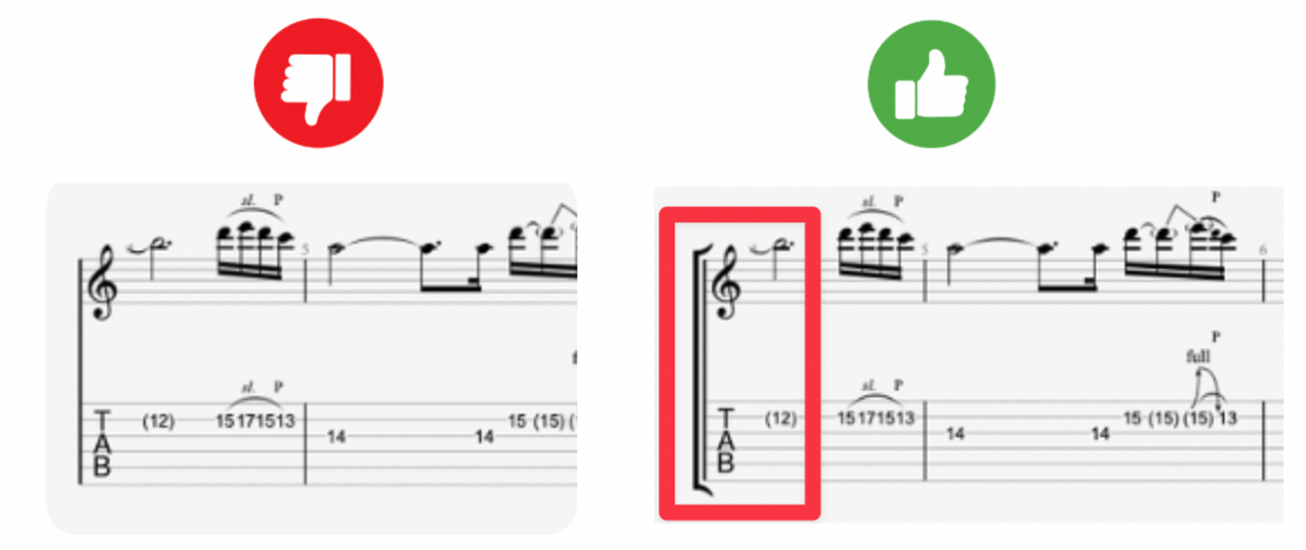
In Stylesheet > Systems and Staves > Brackets, enable brackets to visually group related staves (like standard notation and tablature).
This is essential for:
- Guitar + Tablature combos
- Ensembles or multi-track arrangements
It adds clarity and professionalism to your layout.
Step 6: Display Chord Diagrams
To make your score beginner-friendly, display chord diagrams.
Press A or click a chord to open the Chord Window. Under Display Options, you can choose to show:
- Chord name
- Diagram
- Fingering
In Stylesheet > Page & Format > Chord Diagrams, you can also adjust their size and placement (above score or tablature).
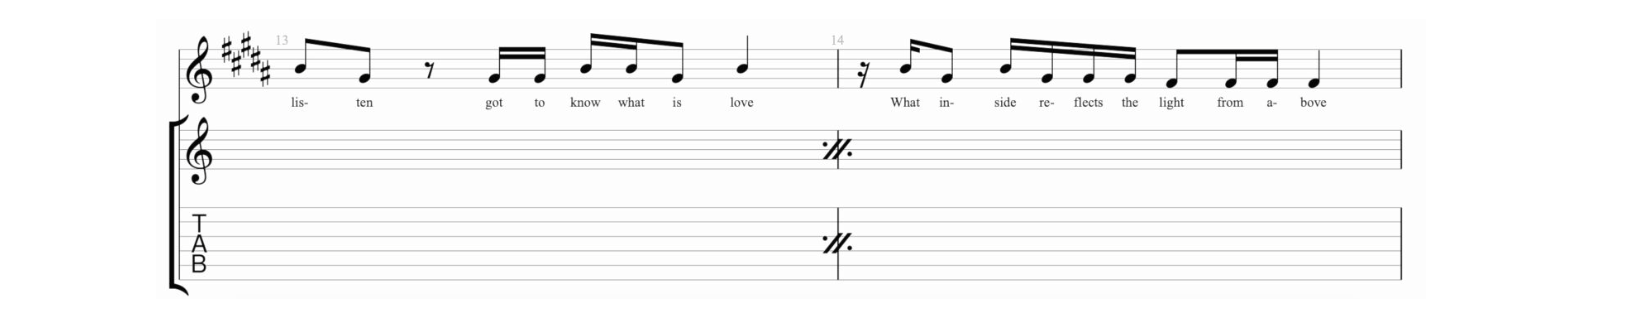
Step 7: Group Empty Bars

Got several empty bars? Clean up your layout using multirests.
Click Bar > Multirest or use Ctrl + R to group empty measures.
This reduces page count and improves visibility, ideal for ensemble scores and sheet collections.
Step 8: Use Repeat Symbols
Repeat symbols help simplify your score and reduce clutter.
Use shortcuts:
- Repeat One Bar: Shift + %
- Repeat Two Bars: Shift + Cmd + %
These indicate that one or two previous bars are repeated, just like in pro sheet music.
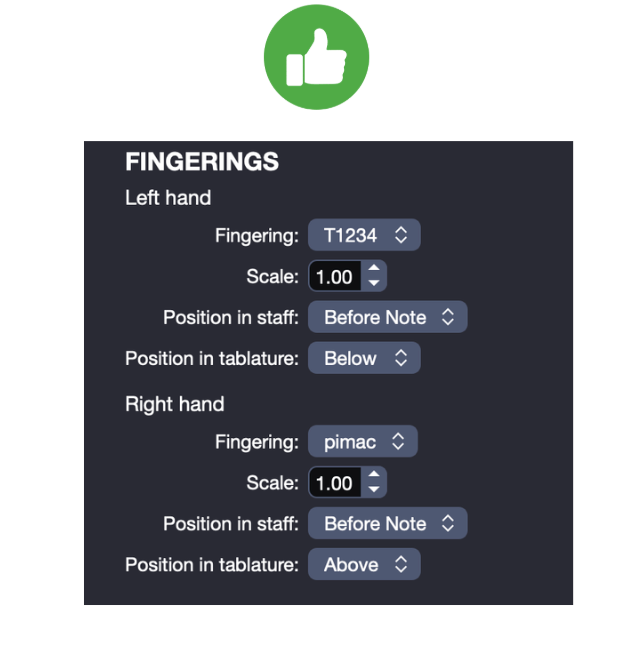
Step 9: Add Fingering for Both Hands
Add left and right-hand fingerings to guide players:
- Left hand: T1234 or P1234
- Right hand: pimac, pimax, or timao
Access this under Stylesheet > Notation > Fingerings.
Consistent fingering helps students and performers interpret your music more easily.
Step 10: Add Lyrics, Sections, and Free Text
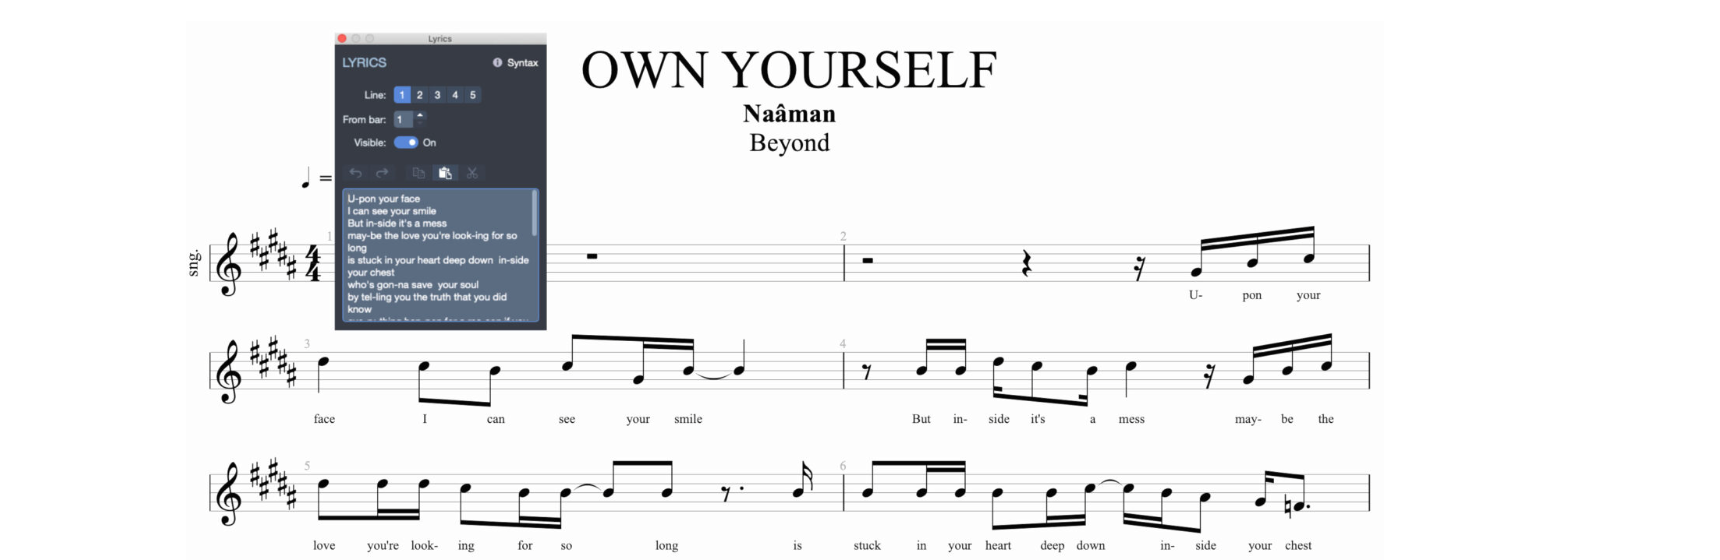
Press T to add text anywhere in your score, great for notes or performance directions.
To add lyrics:
Go to the Edition Palette > Lyrics, and use brackets to label sections: [Verse], [Chorus], [Bridge].
To organize your song structure, click Section > Edit… and label parts (Intro, Verse, Solo, etc.). You can even frame them with brackets like [Chorus] for visibility.
You can choose to indicate your sections with a letter (A), a name (Verse) and to frame the name of the section to make it more visible by adding brackets to your section name like this [Verse].

Step 11: Improve Readability and Flow
A few simple tweaks can drastically improve your score’s readability:
- Show tuning before tablature:
Stylesheet > Page & Format > Tuning > Display tuning > Before Tablature

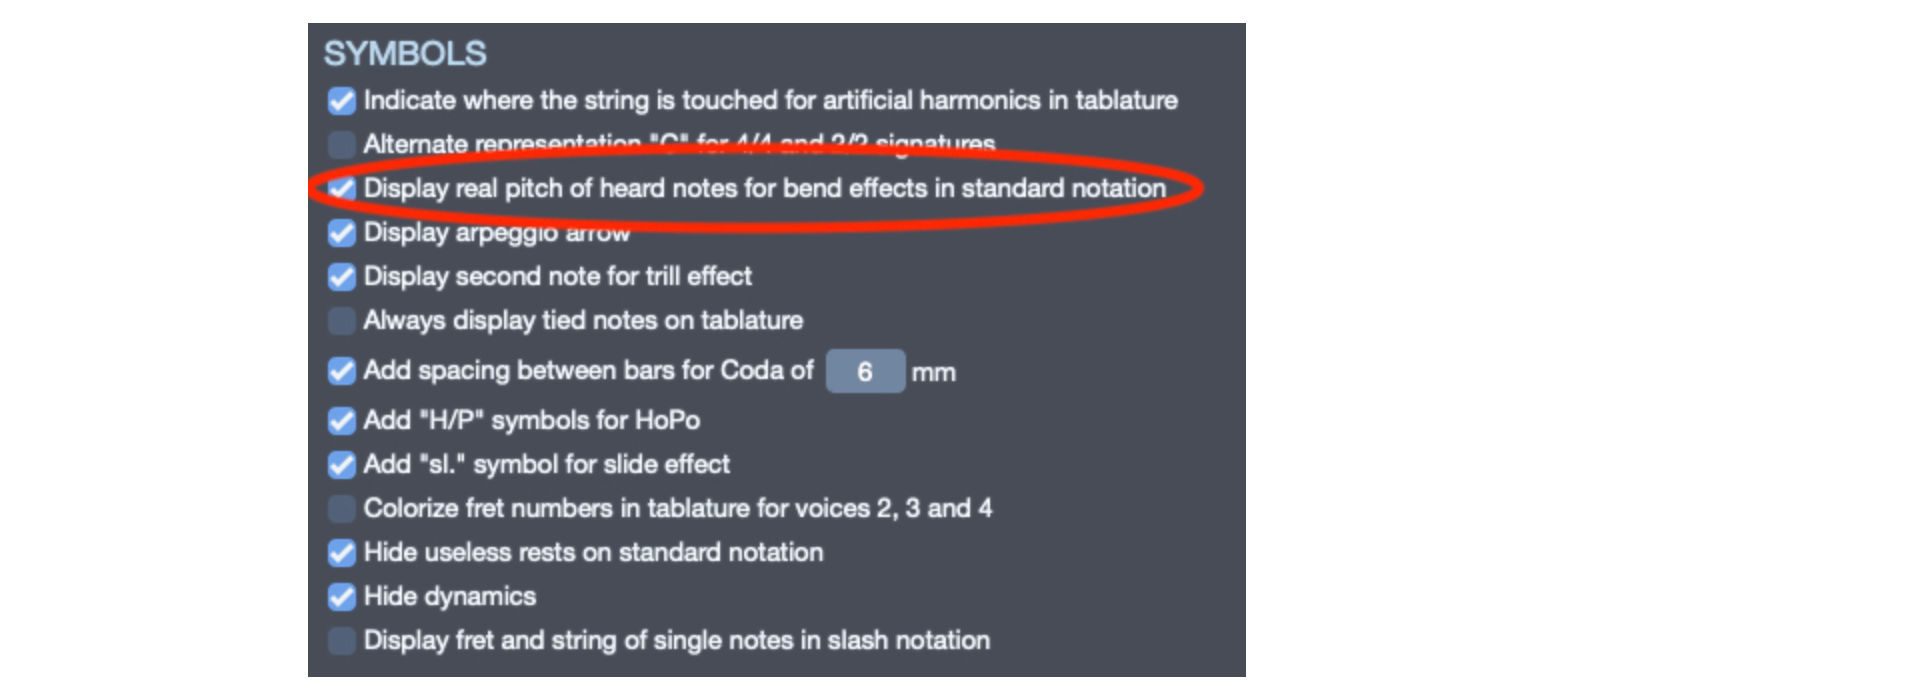
- Display real pitch after bends:
Stylesheet > Notation > Symbols > Display real pitch of heard notes
- Color-code voices for polyphonic clarity
Adjust score proportions:
Stylesheet > Page & Format > Sizes > Global score proportions

These settings help musicians follow your score intuitively, especially in fingerstyle or complex arrangements.
Quick Checklist: How to Increase Your Score Sales
Before you hit Upload, take a moment to make sure your score checks all the boxes below. These small details can make a huge difference in how your tablature performs on PaidTabs.com, both in visibility and in sales.
1. Add chords and lyrics
Including chords and lyrics makes your score easier to follow, helps players understand the structure, and allows them to sing and play along effortlessly.
2. Sync your audio playback
Ensure your score has synchronized playback, it brings your notation to life and makes the experience far more interactive for users.
3. Include fingering and technique markings
Marking left- and right-hand fingerings, bends, slides, and other techniques adds educational value and appeals to teachers and students alike.
4. Keep a clean, readable layout
Use consistent bar spacing, clear section labels, and proper alignment. A visually balanced score always feels more professional and easier to read.
5. Add your PaidTabs profile link
Include your profile link in the footer or information panel. It strengthens your personal brand and helps listeners find more of your work, turning one purchase into ongoing fans.
Pro Tip: The more complete, accurate, and interactive your score is, the higher it will rank in PaidTabs search results, and the more likely it is to be featured in collections and trending tabs.
Useful Links
Guitar tuner: Super accurate, works even in noisy areas, supports 12+ instruments & 100+ tunings
https://paidtabs.com/guitar-tuner-online-free
Transcription service: Turn any song into sheet music or guitar tabs with the #1 transcription service trusted by thousands of musicians worldwide.
https://paidtabs.com/tab-request
Guitar Pro player: Render and play your Guitar Pro tabs online for free.
https://paidtabs.com/guitar-pro-player-online-free
Sell your sheet music: Start selling your original or transcribed scores and receive payments from your fans.
https://paidtabs.com/sell_sheet_music_online
